Para enviar comandos AT y comunicarse con el módulo SIM800L, utilizaremos
el monitor en serie. El siguiente boceto permitirá que Arduino se comunique con el módulo SIM800L en el monitor en
serie. Antes de proceder con el desglose detallado del código, conecte su Arduino a la PC, compile el siguiente código y
cárguelo en el Arduino.
Una vez que abra un monitor en serie, asegúrese de que esté seleccionada
la opción 'Ambos NL y CR'.
#include <SoftwareSerial.h>
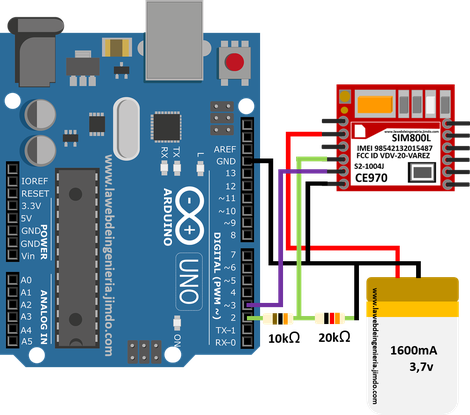
SoftwareSerial mySerial(3, 2);
void setup()
{
Serial.begin(9600);
mySerial.begin(9600);
Serial.println("Initializing...");
delay(1000);
mySerial.println("AT");
updateSerial();
mySerial.println("AT+CSQ");
updateSerial();
mySerial.println("AT+CCID");
updateSerial();
mySerial.println("AT+CREG?");
updateSerial();
}
void loop()
{
updateSerial();
}
void updateSerial()
{
delay(500);
while (Serial.available())
{
mySerial.write(Serial.read());
}
while(mySerial.available())
{
Serial.write(mySerial.read());
}
}
Pasemos a las cosas
interesantes. Programemos nuestro Arduino para enviar un
SMS a cualquier número de teléfono que desee. Antes de probar el boceto, debe ingresar el
número de teléfono. Busque la cadena ZZxxxxxxxxxx y reemplace ZZ
con el código del condado y xxxxxxxxxx con el número de teléfono de 10 dígitos.
#include <SoftwareSerial.h>
SoftwareSerial mySerial(3, 2);
void setup()
{
Serial.begin(9600);
mySerial.begin(9600);
Serial.println("Initializing...");
delay(1000);
mySerial.println("AT");
updateSerial();
mySerial.println("AT+CMGF=1");
updateSerial();
mySerial.println("AT+CMGS=\"+ZZxxxxxxxxxx\"");
updateSerial();
mySerial.print("Last Minute Engineers | lastminuteengineers.com");
updateSerial();
mySerial.write(26);
}
void loop()
{
}
void updateSerial()
{
delay(500);
while (Serial.available())
{
mySerial.write(Serial.read());
}
while(mySerial.available())
{
Serial.write(mySerial.read());
}
}
Ahora programemos nuestro Arduino
para leer los mensajes entrantes. Este boceto es muy útil cuando necesita
activar una acción cuando se recibe un SMS específico. Por ejemplo, cuando el Arduino recibe un SMS,
puede indicarle que encienda o apague un relé. Tienes la idea!
#include <SoftwareSerial.h>
SoftwareSerial mySerial(3, 2);
void setup()
{
Serial.begin(9600);
mySerial.begin(9600);
Serial.println("Initializing...");
delay(1000);
mySerial.println("AT");
updateSerial();
mySerial.println("AT+CMGF=1");
updateSerial();
mySerial.println("AT+CNMI=1,2,0,0,0");
updateSerial();
}
void loop()
{
updateSerial();
}
void updateSerial()
{
delay(500);
while (Serial.available())
{
mySerial.write(Serial.read());
}
while(mySerial.available())
{
Serial.write(mySerial.read());
}
}
Ahora programemos nuestro Arduino para hacer una
llamada. Este boceto es muy útil cuando desea que su Arduino haga una llamada de emergencia / SOS en caso de emergencia,
por ejemplo, si se excede la temperatura o alguien ingresa a su casa. Tienes la idea!
Antes de probar el boceto, debe ingresar el número de
teléfono. Busque la cadena ZZxxxxxxxxxx y reemplace ZZ con el código del condado y xxxxxxxxxx con el número de teléfono de
10 dígitos.
#include <SoftwareSerial.h>
SoftwareSerial mySerial(3, 2);
void setup()
{
Serial.begin(9600);
mySerial.begin(9600);
Serial.println("Initializing...");
delay(1000);
mySerial.println("AT");
updateSerial();
mySerial.println("ATD+ +ZZxxxxxxxxxx;");
updateSerial();
delay(20000);
mySerial.println("ATH");
updateSerial();
}
void loop()
{
}
void updateSerial()
{
delay(500);
while (Serial.available())
{
mySerial.write(Serial.read());
}
while(mySerial.available())
{
Serial.write(mySerial.read());
}
}
Recibir una llamada no requiere
ningún código especial; solo tiene que seguir escuchando el módulo
SIM800L. Sin embargo,
puede encontrar este boceto muy útil cuando necesita activar una acción cuando se recibe una llamada de un número de teléfono específico.
#include <SoftwareSerial.h>
SoftwareSerial mySerial(3, 2);
void setup()
{
Serial.begin(9600);
mySerial.begin(9600);
Serial.println("Initializing...");
}
void loop()
{
updateSerial();
}
void updateSerial()
{
delay(500);
while (Serial.available())
{
mySerial.write(Serial.read());
}
while(mySerial.available())
{
Serial.write(mySerial.read());
}
}